|
Optical instruments are defined as tools to assist sight, to enhance light, extend vision and bring greater clarity to the eye. Nowhere are optics more in evidence than in the sport of hunting, and for good reason. Scope sights, binoculars and spotting scopes all play a major role in the field today. This wasn't always the case. The proliferation of quality optics and their widespread use is a relatively recent occurrence. This explosion of optical products has only happened in the last thirty years or so.
Prior to the Sixties, rifle scopes were restricted to a few brands and each maker offered very little in model selection. Binoculars were heavy, cumbersome and generally a bother to carry. Spotting scopes had limited application outside of use on the rifle range. New technology, lighter materials, more efficient manufacturing processes and enlightened hunter's have changed all that. Optics are what makes today's practical hunter successful.
1. SCOPE SIGHTS
THE ACCESSORY THAT REVOLUTIONIZED HUNTING
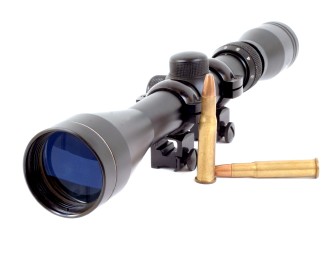
With the advent of rifled barrels and an overwhelming desire to obtain smaller groups, the sights became increasingly more important. As a direct result, increasing effort to improve overall performance ensued. An explosion in scope sight technology began approximately thirty years ago and has continued to the present day. Scopes of the present and recent past are marvels of precision and functional refinement and their acceptance has soared.
The telescopic sight now enjoys universal popularity among serious hunters and is found on everything from the .22 rimfire caliber up to the most potent big game rifle. Almost everyone who uses a modern rifle will have it fitted with a telescopic sight. They are mounted on just about any bolt-action, single-shot, semi-auto, pump-action and lever-action rifle of modern design, as long as ejected cases can be efficiently thrown clear of the scope.
You would naturally assume that the popularity of the scope is due to the fact that it can bring the target closer without actually doing so in the physical sense. This isn't really the case. The unique and valuable aspect of the scope sight is that it solves a longtime problem for shooters. Aiming is done with your eye, which is an instrument of incredible capability. However, the eye does have its limitations. Although a healthy human eye will clearly focus upon any subject from less than 12 inches out to infinity, it is only capable of focusing upon only one object at one distance at a time.
With iron sights, align a target 100 yards away, a front sight 30 inches away and a rear sight 3 inches away from your eye. You will tend to focus on one of these three objects in an effort to get all into line but, in focusing upon any one of these objects, the other two appear indistinct to varying degrees. It's a wonder that any accuracy is achieved with iron sights, although there's no denying some excellent shooting can be accomplished. Now try sighting through a properly adjusted scope! The crosshairs and target are seen in razor-sharp clarity, both are in crisp, simultaneous focus and alignment is perfect.
CONSTRUCTION
 Principles behind the system are fairly simple. A scope sight consists of a series of lenses within a tube that is usually mounted directly above the rifle barrel. In a magnifying scope, good lenses make the target appear larger and distinct. A single built-in reticle or sighting mark appears to be superimposed upon the target. When securely mounted and properly zeroed, a scope sight allows you to see both your target and aiming mark clearly and in the same focal plane. There's no trick to aligning a clearly focused foresight and rearsight with a distant target, as with open sights. Principles behind the system are fairly simple. A scope sight consists of a series of lenses within a tube that is usually mounted directly above the rifle barrel. In a magnifying scope, good lenses make the target appear larger and distinct. A single built-in reticle or sighting mark appears to be superimposed upon the target. When securely mounted and properly zeroed, a scope sight allows you to see both your target and aiming mark clearly and in the same focal plane. There's no trick to aligning a clearly focused foresight and rearsight with a distant target, as with open sights.
Important features to look for are optimum exit pupil diameter and lenses of the highest possible optical quality. The objective lens also must be large enough to gather sufficient light without being so big as to make it necessary to mount the scope too high above the barrel for comfortable use.
With today's scopes, cost is usually in direct relationship to the quality of the instrument. Most of the time, nothing goes wrong with a scope while hunting. When it does and you're close to home, the incident will be more of an inconvenience than a real problem. But if you're miles back in the bush somewhere and something goes wrong with your scope, your hunt might well be over. Purchase the best scope your finances will allow.
MAGNIFICATION
Telescopic sights are available in a great range of specifications and styles. Magnification power may be as little as 1.5X and up to 25X or more. Remember, the higher the magnification, the more it will exaggerate every wobble and tremor of your rifle. The degree of magnification isn't as important to good shooting as you might suppose. With favorable conditions, it is possible to hold groups under one minute of angle (MOA) at one hundred yards, using a two-power scope. If your rifle has the quality, and the cartridges are capable, it is entirely feasible. Higher magnification is obtained at the cost of a non-negotiable tradeoff. As the magnification goes up, the field of view as seen through the scope comes down, in unyielding reverse proportion.
Other sacrifices also have to be made when using higher magnification. Eye relief becomes more critical. The tolerances for moving your eye to and from the scope are at their comfortable extreme with scopes of lower magnification and become progressively less tolerant as the amount of magnification is increased.Over the years, a design has been introduced that has won considerable popularity. It is the variable-power scope. By rotating a ring at the rear, the degree of magnification can be changed to cover the full range offered on a particular scope. Common ranges are of 2X - 7X and 3X - 9X, although both higher and lower spans are offered. The odds are quite good that the variable offers the best of a number of worlds. Although some believe fixed-power scopes have a slight edge in long-term precision, in typical practice, it really isn't so. If a variable is left at the same power setting, the difference in groups fired with it and a fixed-power scope of the same magnification tends to be the same.
One important item you should know about variables is their tendency to slightly change group size when the magnification is changed. To illustrate this, you might want to take a like quantity of cartridges and fire several comparison groups off a solid benchrest with the same rifle and same variable scope at different power settings. Compare the resulting groups. Although there is no way of predicting the results, since so much depends upon the rifle, load, scope and upon the shooter, there will be a difference. However, it is a good bet that a group size at 3X will not be three times as broad as groups fired at a 9X setting. If they are, you probably have a problem with the quality of the scope.
Many excellent variable-power scope sights are readily available. Models are variable from 1.5X to 6X, 3X to 9X, 4X to 12X and 6X to 20X. Very high powers appeal to specialized, long-range varmint shooters. Although most hunters would find a 4X fixed-power scope perfectly adequate, a variable-power scope offering a choice of magnifications from 1.5X to 6X covers most practical circumstances. You'll seldom need more than 4X when hunting. Often, in heavy cover or extremely low light conditions such as at daylight or dusk, a lower power is even more practical. A big advantage of a variable scope is when daylight wanes, you can turn the magnification down. Lower powers give better light-gathering quality.
In time, you may be tempted to use a higher-powered scope. For all practical purposes, a 6X fixed-power scope should be as high as you go. Even so, 6X scopes are best suited for special-purpose, long-range rifles. With variables, go to a 2X - 7X, which is probably close to ideal, or if your heart is set on it, a 3X - 9X. You'll find more often than not, it will be set on 4X, or at the most, 6X - never more. The reason for a variable is to get lower magnification when it's needed. Eventually, you'll notice 9X is not needed for big game. Even though you may occasionally shoot animals using that setting, those shots could have been made by using a good 4X. Most hunters use it just because it's there. If you intend to use the higher settings on a scope as a substitute for binoculars, don't! It's a dangerous, impractical practice and anyone who tries to justify it best stay home. Never point a rifle at anything you're not prepared to shoot, regardless of distance. This is a big game rifle scope, not a set of binoculars.
Over time, most serious hunters settle on a scope in the 1.5X - 6X class for anything from the .25/06 and up. This size fits well on a hunting-weight rifle, sits low and close to the receiver as a scope should, is a bit lighter and definitely less bulky than even a 2X - 7X and has all the optics you'll ever need to get the job done. If any big game animal is so far away you can't get a good sight picture with a 4X, it's too far to be shooting. At the other end of the scale, there's the 1.5X with its tremendous field of view and a conspicuous reticle - perfect for tough shots on fast-moving game at close range in thick cover. In the real world of hunting, there are a lot more of these types of shots than broadside chances at 500 yards, the possibility of which always seems the most critical when you're buying a scope. When still hunting, always have a variable scope set at its lowest power. There's always time to crank it up if you see something 300 or 400 yards away, but never time to crank it down if an animal bursts out of a dense tangle at twenty steps. If you're restricted to one rifle, consider a small variable scope. Although more expensive than a fixed-power 4X, it's more adaptable and you won't have to sacrifice the ultra-short range efficiency. They tend to handle the majority of shooting opportunities that arise and you'll likely experience more success when you go afield.
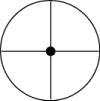
RETICLES
The reticle is the crosshair you see when looking through a scope. It comes in many forms and styles, including flat-topped posts, various combinations of posts and wires and even some with graduations like the aperture sight for target shooting. Without a doubt, the reticle in a scope is largely a personal matter, however, very fine crosshairs become almost invisible in poor light or against a dark background, while very heavy upright and cross posts can obscure a lot of the target and its surroundings.
There is much to be said for choosing the multi-X style of reticle. Outer bold lines become finer central cross hairs. Some of the common trade names are Plex, Four-Post, Dual-X, Penta-Plex, Dyna-Plex, Quadraflex, Lumiplex, Z-Plex, Duplex, 4-Plex or Multi-X, depending on the manufacturer. The tapered crosshair features a wide crosshair on the outer edge tapering to a fine crosshair in the center. It's perfect for precise shooting at long range, yet easy to see on moving shots or in failing light. In both styles you ignore the fine center crosshairs when pressed for time or light and use the thicker outer lines as a "peep sight." Your eye will automatically center the object. Post reticles are sometimes favored for early and late shooting, but multi-X and tapered reticles far outclass it and are even now becoming the only one in use on hunting rifles.
Within range-finding scope sights, two horizontal crosswires are used to gauge the distance to the target by knowing it's size. You assume the distance according to how much space is optically taken up by the object between the two horizontal crosswires.
FIELD OF VIEW
When you can't locate a close in target, it's not the power that's the problem; it's the lack of field. A 6X scope typically has about an eighteen-foot field of view at 100 yards and about 2 1/2 feet at 15 yards. That doesn't show an awful lot of animal. A 1.5X scope averages about 75 feet at 100 yards, or more than 10 feet at 15 yards, which at least improves your chances to see a whole animal. While this may not be a typical situation, such chances do happen.
Many hunters have had a long string of consecutive kills with a scope set at 1.5X. This would occur most often in wooded or densely forested country, but shots could also range out to more than a hundred yards. At normal range, a lower power does perform. The circular sight picture in conventional scopes is also joined by a wider shape, more like that of television screens. This feature can provide a wider field of view and help eliminate undesirable rifle tilting. Full field scopes also attempt to expand your view.
EYE RELIEF
This is the term used to express the distance that must be maintained between your eye and the rear lens to make the whole field of view visible. Too much or too little eye relief will reduce the amount of sight picture that is visible. When in just the right spot, the aiming eye sees an image about the diameter of the scope eyepiece; the reticle is nicely centered and the target is clearly seen behind it. Move your eye back a bit, or in a little closer, and the image shrinks to a smaller spot in the lens. Move your eye away from the center of the lens and some amount of the image is lost, even if proper eye relief is kept.
Heavy-caliber hunting rifles need an eye relief of 3 inches or more. Otherwise the recoil could cause the scope to recoil violently and painfully against your upper face.
FOCUSING A SCOPE SIGHT
The vast majority of us who use scope sights do so under a bit of a handicap, and often we are unaware this is happening. This handicap stems from the fact a scope is often not adjusted to deliver an aiming image as sharp and crisp as it could, if properly adjusted.
Scope makers have a tendency to adjust their scopes to focus sharply on a nearby object. In reality, your target is likely to be a lot further away and the scope will not be adjusted to have crisp focus at that far distance. Most scope sights made for big game rifles have eyepieces that can be turned in or out after loosening the locking ring provided to hold them in place. Through careful and judicious readjustment using the proper procedures, it's not difficult to get most scope sights focused for best accuracy at a realistic distance.
To adjust a close-set scope sight to a greater distance, the eyepiece locking ring must be loosened and turned right-to-left as viewed from the rear. Loosen the locking ring just enough to move the eyepiece while leaving the ring in place as a reference point. Usually when the eyepiece is backed off about one-eighth inch, it'll be close to the proper setting. It's a bit difficult to tell when adjustment is dead-on as your eye tends to focus back and forth between target and reticle, making first one sharp, then the other.
LIGHT GATHERING ABILITY
Today's scope sights with large objective (front) lenses and intermediate power (4X to 6X) have considerable light-gathering ability. This makes it easier to see the target and shoot accurately in dim light, or in the gloom of dense forest - precisely the condition's deer hunters and other sportsmen may have to face.
The diameter of an objective lens is normally measured in millimeters. A designation of 6 x 40 simply means the image is magnified six times and the scope has a 40-millimeter diameter lens at the front. Usually, the larger the objective lens the greater the light-gathering power will be.
There definitely are limits to the light-gathering ability of the human eye. The pupil cannot dilate to much more than about 7mm across. The light and image passing through a scope tube are focused on a small area known as the "exit pupil." If the diameter of this is much less than 7 mm, the eye receives less light than it can normally handle. However, if a scope sight's exit pupil is more than 7 mm, the fully dilated pupil cannot use all the light passing through the sight, which is also an undesirable situation. Ideally, therefore, a scope sight with a magnification and an objective lens size that combine to give an exit pupil diameter of about 7 mm will make maximum use of the shooter's ability to get the most from the sight in conditions of poor light.
RINGS & BASES
Hunting rifles made today are drilled and tapped for scope mounts and most scope makers offer bases as well as rings. Purchase mounting rings in a height suitable for the scope you intend to mount - if your scope has a large front lens diameter, you may need medium or high scope rings. Also, the design of your rifle may affect the choice of rings. If your rifle comes with iron sights, you may wish to remove them, especially if they interfere with the scope mount. If you decide leave your iron sights on, consider installing a Pachmayr Lo-Swing mount. It permits the scope to be pivoted out of the way for iron sight use.
If you tackle gunsmithing yourself, the use of properly fitting screwdrivers cannot be overemphasized. Screws are set tightly and new ones need to be the same. Common household screwdrivers, with their tapered blade tips, slip out of the screw slot, and gouge and burr the screw head when pressure is applied. To avoid marring the screw heads, hex-socket screws are now used for some or all of the mounting. Use quality hex wrenches in the proper size that will not distort under stress, possibly damaging the hex socket in the process. In addition to proper tools, a work surface that provides solid support for the rifle is an absolute necessity.
There are at least two critical factors that need to be addressed when mounting a scope. One is location of the scope. When your rifle is properly positioned on your shoulder, the aiming eye should see the full sighting image of the scope, across the entire eyepiece lens. If you have to shift your head to accomplish this, move the scope forward or rearward until the perfect image is found without effort.
The second important factor is to get the vertical crosshair of the reticle dead centered and parallel with the vertical axis of the rifle and to get the horizontal wire parallel with the horizon when the rifle is held square to the eye.
Thread sealants on screws, Loctite is one of the better known brands, vary as to their degree of holding tenacity. Some can be extremely high. They set up quickly and mild heat hastens the process. In the toughest grades, a screw will usually fail and twist apart before the sealant lets go. Before you apply any sealant to a screw, be entirely sure that the mount is to remain in place forever if some grades are used. When using milder grades, disassembly is sometimes possible by using tools of good quality.
Mounts marketed by manufacturers such as Burris, Buehler, Leupold and Redfield have sufficient similarity to discuss together. Depending upon the rifle, they may supply a one-piece or two-piece base. The base for the front ring has an extremely tight friction-fit in the mating hole in the front mount or in the front hole if it's a one piece base. The rear ring on this style of mount is held to the base by a pair of large screws fitted to milled cuts on each side of the base. This is an excellent system since it improves your ability to install the scope close to its correct right/left positioning, without changing the scope's internal adjustments.
It's always better to run the scope at or near the center of its adjustment range rather than at the extreme end of turret travel. You'll want to attach the front ring to the scope, then use the scope tube to lever the base of the ring into place. Don't, you can ruin your scope if you try it. Fasten the front ring around a piece of one-inch dowel and use the dowel to turn the front ring into its socket so it ends up centered and parallel with the barrel and action. When done, remove the dowel and mount the scope, with rear ring first installed on the tube, back onto the front ring.
Weaver mounts and rings are popular. They are highly satisfactory when properly installed and have attractive prices. The base may be of one-piece or two-piece design, depending upon the action it's to fit. The base is milled from an aluminum extrusion in a particularly tough and durable alloy. Holding screws have big heads with slots of ample width, making it easy to torque them down.
Weaver rings have a clamp that grasps the base or rail and is made from another extrusion of high-tensile aluminum. The attaching hardware is of nicely blued steel. A steel cross bolt rides in a relief cut in the base. Securing hooks are held on one side in a milled slot on the base. The other end is fastened with a pair of slot-head screws.
The Weaver system has many benefits, but it does have one obvious liability. To tighten down the ring hooks so they end up sufficiently square to the rifle, start with one, then move to the others. When finished, it won't move ... usually. When fired, the rifle recoils to the rear. Over time the rings tend to slip in that direction. As you attach the ring base to the rail, press the ring base forward to the limit of its available travel and snub the holding screw into place firmly. It's a big screw head so you can use a large-bitted screwdriver to really bear down. With that said, the Weaver mount is a fine, solid, sturdy and trouble free mounting system. It serves as well as anything else.
If you want an aesthetically pleasing mounting system, consider the Conetrol blocks and rings. As with the other systems, Conetrol bases are supplied as one-piece or two-piece, depending upon the rifle. All component parts of the system are of respectively tough steel and the four, hex-socket, cone-pointed holding screws anchoring the rings to the base - and giving the system its name - are of a select stainless steel alloy.
The base or bases attach to the rifle easily and simply. The rings can be purchased in various heights, as well as in three grades. Each set of side rings and top cap is machined together. It is important that parts remain together because they are not fully interchangeable. The top cap has a front and back in relation to the two side ring halves, as indicated by a tiny nick on the mating surfaces. Assembled rings grasp the scope tube tightly and shifting them to the desired position can be a trying experience.
Another system for mounting scopes and quite possibly the most simple of all is the one offered by Sturm, Ruger & Company for scoping their various rifles. They mill two sets of small recesses in the appropriate places and supply a set of rings to fit. It is unlikely you would encounter any difficulty mounting a scope on a Ruger rifle with their design.
There are other systems such as the claw mount, popular with European hunter's. It can be removed from the rifle quickly and when put back on, it retains the original scope setting zero. Another variation is the EAW pivot mount. Unlike the Pachmayr pivot mount, the EAW does not allow the scope to be rotated vertically to allow use of open iron sights. Instead, you release a small catch that secures the rear ring to its base, then rotate the scope horizontally to release the front ring from its base, permitting removal of the scope and reinstallation in reverse order. The EAW system is designed to retain the scope zero during removal and replacement.
It doesn't pay to scrimp when you purchase your mounting system. Once a scope is attached to your rifle, you'll want it to remain as solidly in position as the day it was mounted. The most problems, by far, that come from a scope sight mount on a rifle are from the mounting system setup, not the scope itself.
While it's not difficult to attach a scope mount yourself, you must be set up for it. That doesn't means common household screwdrivers and a hammer. If you do not have the proper tools, take your entire rig to a competent gunsmith you trust and allow them to set it up. This should ensure you many years of trouble free shooting.
SIGHTING IN A SCOPE SIGHT
There are several different methods of sighting in a newly mounted scope sight. You start by performing a coarse adjustment, then move to the fine tuning. Use the right and left holding screws at the rear mounting ring if lot's of coarse adjustment is necessary. Remember not to put the scope tube under too much stress in so doing - the front ring base is a tight fit in the mount. If it's off by much at all, use the piece of dowel to move the front ring again. Save internal scope adjustment for the actual zeroing-in.
A bore sighter (also called a collimator) is a good approach. Devices such as the Bushnell optical bore sighter or Sweany's Sight-Align are optical devices that attach to the muzzle of the rifle. Both position a reference grid in front of the scope, held in place by an expanding collett installed in the bore at the muzzle. Looking through the scope, you adjust the reticle to the center of the grid. This procedure can align the scope so close your first shot at 100 yards will hit within a few inches of the aiming point.
Bore sighting is another approach to matching the sight picture with the alignment of the bore. This is done by securing the rifle, looking through the bore, "aiming the bore" at a target and then adjusting the sights until they are "looking" at the same place. Bore sighting will assist you in getting that first shot on the paper. It's entirely possible to come fairly close by judicious eyeball techniques.
If you can view up the bore, such as with bolt-actions or single-shot rifles, prop the rifle solidly on sandbags and center a prominent object in the bore. A one inch diameter circle placed 25 feet away is ideal. If desired, an empty cartridge case with its primer removed, can be inserted in the chamber to give a finer boresighting view. Now look through the scope and see how closely its reticle matches the subject. Make the necessary adjustments to line the reticle up with the target, either by moving the screws that hold the base of the rear ring, or if you're close, by using the adjustments in the scope turret.
With semi-auto, pump or lever-action rifles, it's not possible to get a clear view up the bore. While you may be able to get a look using a small mirror, you're probably better off to sight in on paper from the start. Use a large target and start ridiculously close. If you don't, you may not catch a hole on paper at all. With these types of actions, a collimator really is your best option.
Final coarse adjustment at the rifle range is not difficult. If you're still several inches out after firing your first group, move the entire scope on its mount again. This exercise involves moving the reticle toward the hole left by the previous shot. If you aim at a given spot and the bullet strikes to the left, loosen the right rear screw that holds the base of the ring and turn in the left screw to take up the slack you've created. Shoot again. If your bullet strikes to the right, you've over-corrected and you need a touch of vice versa. Once you bring the points of aim and impact within a few inches of each other at 100 yards, you can make use of the internal turret adjustment.
Usually, adjustment knobs or dials are covered by protective caps. When uncovered, they are marked to indicate Right and Left. Frequently they show a single-pointed arrow for Up, but occasionally both Up and Down are indicated. Most of the better scope makers even tell you one click of adjustment is good for one-minute of angle, or whatever.
Groups are two or more shots fired at the same target with the same rifle. They are usually measured from the center of one bullet hole to the center of the farthest bullet hole from it. Minute Of Angle (MOA) is one sixtieth of one degree, but within shooting circles a minute-of-angle consists of one inch at 100 yards, two inches at two hundred yards, three at 300, and so forth.
A rifle capable of minute-of-angle accuracy will group its bullets into an inch center to center at 100 yards, two inch's center to center at 200, three at 300, etc. Zero is the point at which the rifle is sighted-in to deliver its group. A rifle "zeroed-in" for 200 yards prints on the center of the target at 200 yards.
Often, an inexperienced shooter will not be able to quickly find the target through a scope sight. All that's necessary is a little practice. Place the rifle against your shoulder and nestle your head against the stock into whatever position it takes to get a full scope picture. Slightly move your head around to make sure it's not only the right position but the most comfortable. Once accomplished, memorize the position. The important part is to practice until it comes automatically. Know exactly where your head has to be to place your eye in line with the scope. The rest is simple. As the rifle is brought to the shoulder your head is leaned into position so that when the stock touches the shoulder the cheek is in place on the stock and you are ready to shoot instantly. You can accomplish all this without ever taking your eyes off the target. It's really not too complicated.
2. NON-MAGNIFYING SCOPE SIGHTS
 OPTICAL SIGHTS THAT PUT YOU ON TARGET OPTICAL SIGHTS THAT PUT YOU ON TARGET
Somewhere between open iron sights and scope sights are a few systems that are commonly termed non-magnifying optical sights. One design gathers ambient light and tints it with fluorescent dyes to present a spot or reticle of bright red to an angled mirror so the colored spot is seen superimposed upon the target. Two examples are the Weaver Qwik-Point and the Thompson/Center Insta-Sight. Another example is the Cyclops sight that is manufactured in England and distributed in North America by Millet Sights.
All three of the above-mentioned sights provide for adjustment of the aiming spot in much the same manner as an adjustable rear sight. There is one downside. With no internal lighting system, all three lose their spot or reticle under conditions from heavy dusk to complete darkness.
The Qwik-Point and Insta-Sight are relatively free of parallax problems. This means the aiming point or crosshairs remain centered on the aiming point if the gun is held still and the aiming eye is moved around a bit. Move your aiming eye around while looking through the Cyclops and you will see the colored spot move correspondingly. To achieve maximum effectiveness with the Cyclops sight, you must bring the stock up uniformly from shot to shot so as to keep the aiming eye in the same exact place every time. This is not always an easy feat.
 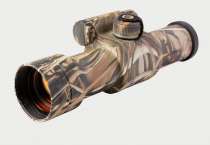 Another example of a non-magnifying optical sight is the Aimpoint. Unlike the three units described above, it has an internal battery and a rheostat so the illuminated red dot appears independently of light conditions. By adjusting the rheostat, the degree of brightness is controlled to your individual taste. At lower levels, it presents what appears as a dot of smaller diameter for improved precision in aiming at targets that are small or far away. Another example of a non-magnifying optical sight is the Aimpoint. Unlike the three units described above, it has an internal battery and a rheostat so the illuminated red dot appears independently of light conditions. By adjusting the rheostat, the degree of brightness is controlled to your individual taste. At lower levels, it presents what appears as a dot of smaller diameter for improved precision in aiming at targets that are small or far away.
For all practical purposes, the Aimpoint is totally free of parallax. With a bit of practice, most shooters can aim through it with both eyes open to achieve a stereoscopic sighting picture. This feature can be extremely beneficial under certain conditions. Aimpoint also offers an accessory lens system that can be added to magnify the image in the manner of telescopic scope sights.
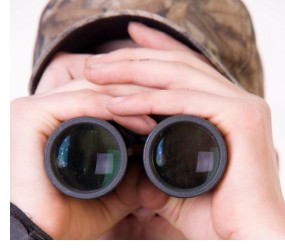
3. BINOCULARS
 WHY BOTHER ... I'VE GOT MY RIFLE SCOPE! WHY BOTHER ... I'VE GOT MY RIFLE SCOPE!
A pair of binoculars is almost as important as your rifle and scope in the field. You probably know a lot of hunters who do not use a binocular, and you should try to avoid hunting with them. Some so-called hunter's claim their vision is so sharp that they have little use for a glass - a preposterous statement at best. The flick of an ear at 200 yards through brush is terribly hard to see with the unaided eye.
Others attempt to use their rifle scope as a substitute for a set of binoculars. They are constantly bringing their rifle to bear. This practice involves a lot of movement and motion spooks game. It's extremely tiring as well. See how long you can hold an eight pound rifle to your shoulder without wavering. These misguided souls often find themselves aiming at other hunters. Remember, there are a lot of hunters who rightly take exception to being glassed through a scope ... sometimes they're not so civilized as to how they react.
The second best argument against using a scope to search for game is that you cannot see as well with one eye as with two. As well, using a single eye does not give you the depth-of-field you need to accurately judge distance and proportion.
 Regardless of the argument presented, a hunter who refuses to use a binocular either doesn't own a set or is too lazy to carry one and learn how to use it. There just isn't a good reason not to use binoculars in the field. For increased success, use them. Regardless of the argument presented, a hunter who refuses to use a binocular either doesn't own a set or is too lazy to carry one and learn how to use it. There just isn't a good reason not to use binoculars in the field. For increased success, use them.
TYPES OF BINOCULARS
Today there are all sorts of binoculars on the market, which wasn't always the case. There was a time when all you could get were 3 pound monstrosities that were not only a true bother to carry, but their quality was often questionable.
Present manufacturers now present a wide selection of roof prism and porro prism models in conventional and compact sizes. Both designs are equally efficient. Compacts work as well as full-size models. There's no good reason you cannot find a binocular that will serve you well. While a quality glass can cost a substantial amount of money, it is a lifetime investment.
MAGNIFICATION AND UTILITY
The magnifying power of a binocular is important, but the practical has to be addressed as well. Although high-powered binoculars will tempt you when making your purchase, for all practical purposes they are not generally the best buy - remember why you're investing in a glass. Forget the big, heavy, high-powered models such as the military uses. They're too much glass for a hunter to carry and to use. Even the standard 7X35 porro prism is not a handy size for most hunting situations.
To be useful, a binocular has to be light in weight, easy to focus and most importantly, convenient to handle. A concession has been made by makers of binoculars to keep down weight and bulk. A new generation of hand-held glasses, with the hunter in mind, has appeared in recent times. They are called the compacts.
The designation on a binocular, say 8X50, means the glass has 8 time's magnification and 50-millimeter objective lens. The higher the power, the further you can see, but it's harder to keep the sight picture steady and even though larger objective lens increases the light gathering ability, they add to the bulk. Common sense plays a large role in choosing the right binocular and in this case, bigger is not necessarily better.
The standard glass carried by most hunters is the 7X35. If purchased in a lightweight model, this glass serves well for almost all hunting. It's compact and not tiring to wear. Better yet are the 7 to 9 power, 20 to 30 mm compacts.
Quality, waterproof, rubber-armored compact binoculars weigh less than 10 ounces and last you a lifetime. Six power glasses are too small for most use and over 9 power is difficult to hold steady.
FOCUS
Use binoculars with an individual focus on each eyepiece. Center-focus glasses operate by focusing at the center for one eye and then focusing the other eye separately at the eyepiece - obviously an inconvenient way to adjust to your vision.
Individual-focus eyepieces are marked in plus and minus (-1, +1, +2, etc.). When you find the proper focus for each of your eyes, memorize the numbers. Then, if someone changes the focus, it's a simple matter to instantly reset the focus back to your personal setting.
THAT ALL-IMPORTANT CARRYING STRAP
All binoculars come with a strap that is about twice as long as it should be. Why that is, we just don't know. Most hunters leave them that way. Consequently, you'll walk along with the glass hanging at your belly, bouncing and swinging. Your strap should be long enough so the glass rests against the middle of your chest. It's easy to reach there and can be zipped or buttoned partly under a jacket. It won't flop around much either. Leather and elastic combination straps are also available that help to hold the glass tightly in the proper position.
 HOW TO SUCCESSFULLY USE BINOCULARS HOW TO SUCCESSFULLY USE BINOCULARS
In the field, binoculars can make all the difference between a successful hunt and a disappointing outing. Especially in open areas, you can locate big game animals that you would never see without the aid of glasses. It's not a matter of simply looking through the binoculars - a specific technique is necessary to really find your quarry with these extensions of the eye. With practice, it can be done, and is done all the time.
A quality pair of binoculars, steadily handled, are a lot easier to handle in the field than a spotting scope. While it cannot compete with the optical efficiency of the spotting scope, it's a better means of spotting game and looking for possible trophy heads. Find a rest for it - even a log or rock makes for a more solid rest than your unsupported arms.
At least 95 percent of your hunting will consist of looking. A binocular extends the range of your vision and gathers light. It allows you to see into dark places, such as the edge of woods, that otherwise appear empty. Glassing is the biggest part of the hunt, particularly when hunting game that blends well with their surroundings. Sheep and antelope are  prime examples. Never glass while standing up on a ridge, as every animal within a half mile will see you. In hilly or mountain country, get up high and glass across and also down. All big game animals see much better down-slope than up and seldom look up. prime examples. Never glass while standing up on a ridge, as every animal within a half mile will see you. In hilly or mountain country, get up high and glass across and also down. All big game animals see much better down-slope than up and seldom look up.
Using a glass doesn't mean a single quick sweep of the country in front of you. Take a long, meticulous study. Stare long enough at a pile of distant rocks lying against a slope on the plains and they'll often turn into antelope. Study black upturned roots and dirt from a large fallen tree. Occasionally, they'll transform into a moose. Exercise patience.
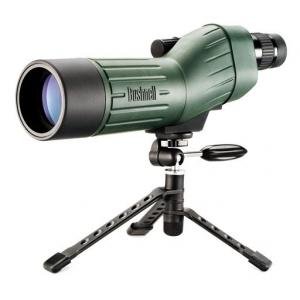
4. SPOTTING SCOPES
SAVE THOSE MILES!
In addition to a quality binocular, every serious hunter should own or have access to a spotting scope. Originally developed for target shooters to assist in competitive shooting or when sighting-in a rifle, weight and bulk were not prime considerations. For these reasons, early models were a nuisance to pack along on a hunting trip and even worse to carry afield.
The spotting scope for the big game hunter has come a long way in recent years. They are now considered essential equipment on most types of big game hunts. Serious sheep, pronghorn antelope, elk and mule deer hunters would never venture afield without one.
Meant to help the hunter evaluate distant animals, spotting scopes save you many miles and hours of arduous stalking. While not many whitetail hunters use them due to the type of cover these animals are normally found in, this glass does sterling duty in any country that has big open spaces, expanses of logged-out areas or terrain where canyons and sweeping valleys are present. This optical aid is also used in many other ways - for animal watching, finding a partner on another hill or even locating a distant landmark.
TYPES OF SPOTTING SCOPES
Compared to what was available only a few years ago, the new lightweight, compact spotting scopes are a windfall for the serious hunter. Beneficial on the shooting range, these optical instruments also are highly useful for backpacking hunters as well. Wherever weight and bulk are an issue, there is a spotting scope available that will provide excellent service.
Different designs are the roof prism, folding mirror and prismatic lens style. All are equally efficient. What it really comes down to is individual preference when choosing your scope.
There are currently half-a-dozen or more spotting scope makers who offer a wide range of models. Features include rubber armour, waterproofing, variable eyepieces, compact size and lightweight, rugged construction. Some top quality models are less than 20 ounces in weight, shorter than 10 inches in length and will fit in an over-sized jacket pocket.
MAGNIFICATION
Magnification runs from 10X right up to 60X. The old turret-style models that allowed for a choice of several magnifications have given way to interchangeable eyepieces and zoom types for changes in magnification. It really doesn't matter which design you invest in...they all work well.
At higher magnifications the field of view is very small and it's difficult to find an animal through a 30X scope. Better models feature a built-in peep sight for coarse sighting. Then, once you've zeroed in, it's easy to pick up the animal through the lens. Because absolute steadiness is required and mirage sometimes wipes out the view, the best compromise is a spotting scope from 20X to 25X. This range of magnification allows you to accurately appraise heads at least a mile away. Variables that zoom over a range of 15X to 45X are more than adequate.
ESSENTIAL EQUIPMENT FOR TROPHY HUNTING
You don't use a spotting scope to glass an expanse of country - that's why you carry your binoculars. A spotting scope's function in the field is to study distant animals at close range, after they have been located and because most modern spotting scope makers offer lightweight, compact models, they don't have to be left behind.
Due to a scope's high magnification, some hunter's try to steady it over a log or rock. Your scope should be equipped with a small, ultra-light tripod - use it for maximum stability. Most scopes and tripods can be carried in a backpack or even a large pocket.
Often, elk, moose and mule deer live in terrain where they can be seen over long distances. For goat and sheep hunters, a spotting scope is a necessity. Antelope hunters after a really good head cannot do without one. All too often an animal may look as if it might be the one you're after through lower-powered binoculars, but a spotting scope will save you a lot of effort that might otherwise be wasted in stalking closer to an animal that isn't good enough. Spotting scopes definitely have their place with the serious hunter.
|